I generally don’t eat oysters, well at least the Pinoy way. People here give them a brief hot water bath then make them swim in a pool of vinegar and chopped onions. To be honest, I have never even tried it. The thought of eating slimy green blobs swimming in vinegar and raw onions is just nauseating. I hate vinegar (but not in pinaksiw, or when vinegar is cooked).
I first tasted oysters in Bangkok. In Thailand, almost everything is served swimming in chili and I thought it was an appropriate time to be adventurous. We were at a Thai-Chinese seafood restaurant and were served a plateful of oyster omelet on a sizzling platter. It was buried in a mound of julienned leeks and served with some chili paste. I actually enjoyed it, and could not believe myself. The chili and onions (!) helped initially, but I soon realized the egg actually stole away the show from the oysters. And the little blobs weren’t slimy at all. It became one of my favorite Thai/ Chinese dishes.
So, confronted with a mound of fresh oysters, I decided to make some omelet:
You can buy oysters on the shell or get the ones from the market shelled. Whatever the case may be, you need them shelled, cleaned, rinsed and briefly doused with hot water. You will need 1 cup of oyster meat. Strain then set aside.
If the oysters are “leaking out” some juice, add this to three eggs and beat until combined. Otherwise, substitute three to four tablespoons chicken stock. Season with some pepper and salt.
On a VERY HOT oiled pan, preferably non-stick, add a tablespoon of chopped garlic and two slices of ginger that have been slivered. You may adjust the proportion, but this dish is usually garlicky. Dump in the oysters (DO NOT include any water dripping from the oysters) and toss briefly. The pan has to be H-O-T so as not to make the oysters sweat, otherwise this will turn into a stew. Toss for around 20 to 30 seconds.
Lower heat to med-high, then pour in the eggs. Let the bottom part set before mixing. We are not making a pancake or the western omelet. This is more like scrambled eggs. It is difficult to give an amount of time, but you have to inspect the eggs for the doneness that you prefer.
Serve garnished with julienned spring onions, coriander leaves and chili sauce.
Monday, November 19, 2007
Saturday, November 17, 2007
Fried Rice
(leftover steamed rice works best for fried rice.)
It is so easy making fried rice. Not to mention the fact that it is the best way to use up leftover steamed rice!
Leftover rice works best for several reasons. First, because this is relatively dry and will absorb most of the seasonings you put. Second, the rice grains are much easier to separate once they have cooled.
You can use whatever leftover meat or fish or even vegetables as the flavoring for your fried rice. But I usually use fresh ingredients when I make some as I like having a “theme” to my dish.
Today, I made some mixed dried seafood fried rice with preserved mustard and mushrooms. Quite a long name, only because I named almost everything that’s in it!
I a small saucepan I boiled some dried seafood: shrimp, scallops and cut up dried squid (make sure you use the skinless “premium” dried squid or don’t bother at all!). I also tossed in some dried mushrooms. I find it easier and less messy to cut up the squid and mushrooms using kitchen shears prior to boiling. Add enough water to cover and boil for 30 minutes or so, just until the scallops fall apart into threads and the other seafood are tender.
Drain seafood and cut up the shrimp into small bits. You can boil off the rest of the liquid until you have around ½ cup.
For this dish, I also used up some preserved mustard. I refuse to call them pickled mustard as some Pinoys would translate “burong mustasa” as such. Firstly, they were not preserved in a sour liquid. Nor were they fermented. Rather, they are merely salted and allowed to “cure” for a couple of days.
Remove mustard from the bottle, rinse with water and squeeze. Then cut them up to small pieces.
I a large wok, heat around 2 tablespoons oil. I prefer using a non-stick pan as this would consume less oil. Sauté 3 cloves chopped garlic, one thumb-size piece of ginger chopped or cut into slivers, one medium onion sliced. Sauté until fragrant. Add the boiled dried seafood and the mustard. You would need around two to three tablespoons dried seafood and around the same amount of chopped mustard. You need to cook the mustard until its color has changed to a bright green, around a minute.
Add in three to four cups leftover steamed rice. Mix thoroughly. Season with one tablespoon chicken powder (substitute chicken bouillon cube), two tablespoons oyster sauce or soy sauce and some pepper. Add also some of the cooking liquid from the dried seafood. If using a bouillon cube, dissolve it in this liquid prior to adding. I never add salt as the previous two are already salty. Stir fry until well-mixed.
Friday, November 16, 2007
Mango Cream Pie
(this pie needs to be chilled well as it melts at room temperature.)
Mango cream tart
My mother just could not resist leaving Conti’s without buying a cake. I got her to grab the mango cream tart as we’ve never tried their version before. We have always been crazy for anything mango. In fact, during the height of Red Ribbon’s 80s success, we would always buy their mango cake, mango cream pie and mango tart.
In case you’re wondering, we did not pick the Mango Bravo (although I had to convince my mom from doing so), because I have serious issue against this thing. No, I don’t have allergies to it. But I think it does not have any right calling itself a “cake.” It is merely a toasted ground-nut meringue, iced with cream and decorated with mangoes. And oh, they put chocolate syrup on top! Sacrilege!!!
To my disappointment, their mango cream tart was just, well, mango cream in a tart shell! I was expecting something more elaborate – just like the ones at Red Ribbon. (I don’t know if they still have it.) The ones at Red Ribbon had a shortbread crust, a layer of pastry cream, I think it also had a bit of whipped cream, then a layer of mangoes, and lastly a layer of gelatin.
Today, we had some over-ripe mangoes and someone had to intervene! I did not have much time, so I made my mango cream tart in the fashion of Conti’s, but of course, mine tasted better and less commercial.
Shortbread Crust
Preheat oven 350°F.
In a bowl, mix together 2 cups flour with ½ cup confectioner’s sugar and a pinch of salt. Add in ¾ cup melted butter. Mix until mixture comes together. We are not making a traditional pastry crust here so we don’t have to worry about cutting the butter – that is why we add it in melted. This is not a flaky crust.
Press on a tart pan (8 or 9-inch round pan) and bake for 20 - 30 minutes until edges begin to brown, and surface is lightly browned. Cool on pan.
For the mango cream tart, you need to
Filling
Make some pastry cream: on a saucepan on medium heat, scald 2 cups milk (you can use half and half, or even all-cream). Add sugar (usually ½ cup or more, depending on how sweet you like it), and also around two tablespoons of powdered gelatin. Be sure to mix the gelatin with the sugar before adding them, or the gelatin will clump together.
Meanwhile on a bowl, beat together three yolks and one whole egg. When milk is about to boil, pour the milk over to the eggs while whisking to prevent them from coagulating. Pour this mixture back into the pan. Now switch gears to a wooden spoon and mix constantly until this mixture thickens to coat the back of a spoon. When thick, remove from pan and pour onto a bowl. Stir in ¼ cup of cold butter. This will help cool the mixture. Continue stirring until combined. You may also add in one teaspoon of vanilla extract. Cool completely.
When custard is cool/ room temperature, whip one cup of very cold cream until fluffy and doubled in volume. Fold in the custard. The gelatin in the custard will “gel” the whole mixture together.
Pour this mixture on to the chilled crust. Chill. When completely set and firm, decorate top with some sliced mangoes.
Wednesday, November 14, 2007
Garlic Chicken Wings
(this dish has tons of garlic! but also with an Asian twist.)
Garlic lover’s Buffalo wings – that is the best I could describe this dish. This is an Asian take on that spicy chicken dish, especially for people who cannot tolerate that much heat. This dish however, is not really that mild – the flavors are strong with all that garlic and coriander stems and leaves. You can even had hoisin sauce for a stonger Asian flavor. But the combination of garlic and oyster sauce works best for me.
You can leave out the coriander if you happen not to like that herb. The sauce can be stored in the refrigerator or freezer. It keeps in the ref for around a week, but the coriander flavor overpowers the garlic towards the end of several days.
Chicken
You can marinate one kilogram chicken wings or parts in a marinade similar to that for the buffalo wings, or leave it seasoned with salt and pepper.
Dredge the chicken pieces lightly in some cornstarch and fry until cooked through. Drain on a paper towel.
Sauce
Combine together the following ingredients: one tablespoon minced fresh garlic, one tablespoon chopped fresh coriander/ cilantro, two tablespoons good quality oyster sauce, one teaspoon sugar, one teaspoon lemon juice, one teaspoon freshly cracked black pepper. You may also add about one tablespoon of hoisin sauce.
Mix sauce ingredients thoroughly. Toss the hot wings or chicken parts into the sauce to coat evenly.
(season and fry the chicken parts however way you want, but leaving it a bit on the bland side is probably best so that the garlic sauce has no other flavor to compete with.)
Tuesday, November 13, 2007
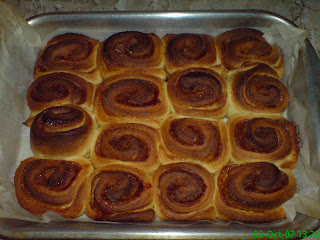
Cinnamon Rolls
(Moist sweet rolls of bread perfumed with cinnamon.)
I know I swore never to come anywhere nearer than 10,000 miles of a cinnamon roll. Yes, I just hate stale (or at least dry, as you get them from food stores) bread stuffed with a gargantuan amount of cinnamon it overpowers even the tons of sugar glaze it swims in.
But I am not a hater of all bread that is rolled. I just don’t like the way most shops and people make their cinnamon rolls. It is either too sweet, has too much cinnamon, or the bread is plain thrash.
Like what I previously said, I do make my own rolls and more often than not, I fill them with stuff other than cinnamon sugar, like monggo (azuki or red beans) or apples.
So why did I finally decide to make plain old cinnamon rolls for only the third time in my life? Because, I chanced upon Peter Rheinhart’s recipe for it (here and here), and I have been dying to have his book for a very long time now (There, for all those who would be buying me something this December, here’s an idea. I pledge a year of baked goodies to whomever will give me a copy.) The recipe was taken from The Breadbaker’s Apprentice – Reinhart’s award-winning book.
The concept put forward in the recipe – that cinnamon rolls and sticky buns are two DIFFERENT entities has really won me over. On the one hand, you have a roll perfumed with cinnamon with an ample amount of sugar glaze that balances the cinnamon’s perfuminess. On the other is a roll bathing in caramel and nuts with no cinnamon to confuse its taster. And yes, the ones we see at malls and bakery fairs are the bastardized cinnamon rolls bathing in caramel! Also, Reinhart’s addition of lemon zest to the dough gives it a fruity aroma.
I made cinnamon rolls and I urge you to try one of his versions. I’ll be making sticky buns in the coming days.
I'm Back!
Nope, my internet connection is still a bit iffy but i will at least try and post on this blog whenever I can...I never stopped cooking and experimenting and I have some interesting recipes coming. Stay tuned...
Subscribe to:
Posts (Atom)