Wednesday, December 26, 2007

Diploma?

cash advance

Cash Advance Loans


After greeting everyone in a few foreign languages, I just got a diploma for my blog!

Merry christmas again!

Christmas Dinner

Tonight is born our Savior, Jesus Christ! Rejoice!

Christmas had always been a time to reflect and spend time with family. Tonight, we are having a simple dinner: Roast Turkey with Orange Gravy, Buttered Vegetables and some Garlic Mashed Potatoes.
Merry Christmas, everyone!
Maligayang Pasko sa inyong lahat!
Kurismasu Omedetou Gozaimasu!
Froehliche Weinachten!

My Blog's Readability

cash advance

Get a Cash Advance


You need to be at least a college undergrad to read my blog. Ahem, ahem.

Sunday, December 23, 2007

Baked Salmon Steak


Salmon, though moist and tender when eaten raw (smoked or sashimi) can get very tough and dry when cooked. It may even taste off. Hence, it has to be seasoned well and cooked in the right amount of time.
I recently bought a small piece of salmon fillet and thought of baking it with a simple seasoning. I seasoned the slab of fish with plenty of pepper, then applied a generous amount of garlic spread I made earlier on the surface.
I baked the fish at 350 degrees for around 10 minutes. Remember, roasts continue to cook even after you have taken it out of the oven due to residual heat.

Garlic Butter


Many think it is a mere combination of garlic and butter. But I always try and add a few other stuff to make things more flavorful.

This "spread" is quite versatile. I spread it one bread then toast them to make garlic bread. On occasion, I smear it on cuts of meat or seafood then bake it, much like the French baked escargots. For quick sides, you can melt spoonfuls of this compound to saute some cut or precooked veggies.

I used up three whole heads of garlic, peeled and chopped. This makes for a very strong garlicky paste. You can use two or even one head if you want it milder. I also added some chopped parsley both for color and flavor. I used flat-leaf parsley as it gives a more herb-y flavor that curly-leaf parsley.

In a blender or mixer, beat one cup of butter. Add in the chopped garlic and chopped parsley. Mix well. Slowly add in 1/2 cup extra virgin olive oil. This will make the mixture spreadable and of course, healthy. Season with salt and pepper.

Salcedo Village Saturday Market

I typically hate going to markets. Markets are almost always a disorganized place. Goods are scattered everywhere, hawkers shouting, and some of the produce reek of foul odor. So this was one of the really rare occasions I visited a "market."

This market being on a Saturday, and at the heart of the city's posh business district, one could only surmise that their standards should be a bit higher. True enough, half the stalls were selling cooked food - specialty cuisine you won't get anywhere in Manila. Most of the vegetables were clean and crisp, and the fresh seafood were typically frozen.

We entered from the side of the Saturday market, from Salcedo park, and we were immediately greeted by a waft of fresh seafood air! It wasn't really foul, but you could tell there was fish blood somewhere. They were selling freshwater prawns by the way. (Ulang in the local language).

Other stalls were selling ornamental plants and other inedible goods.

An heirloom restaurant was selling their famed lengua in white wine, fabada asuriana and the really scrumptious slow roasted pork. They also had a whole rack of bottled queso de bola spread, so it is apparently very popular.

There was a Singaporean lady selling some chicken rice. I just had to get myself some! Half of that whole stack of chicken was gone by the time we circled her store a second time.

A French guy had a whole army of maids selling some really yummy French food. The price was reasonable, so we just had to buy a whole roasted chicken and some duck. We totally forgot he had some pate with armagnac on sale.

The French guy was also selling some fine savory tarts.

I just thought a picture of the buko jelly was worth posting.

Another stall specializes in carabao's and goat's milk products. They even have sugra-free pastillas!

We were done shopping for food when we came across this Vietnamese lady selling fresh spring rolls. We had to make room in our basket for one pack. It was simple, healthy yet really heavenly. We are sure to return, if only for this!

One end of the market was actually flooded with barbecue stalls. This is just one of the "hundreds" of other stalls selling barbecue.

My father could not stop ogling at the lechon kawali. But he is on a diet in preparation for Christmas eve dinner, so he eventually let go.
More to come about this market on succeeding visits. Also watch out for features about the food!

Saturday, December 22, 2007

Brandy Prune Cake


I was craving for something decadent the other day and was actually planning on making a really rich chocolate cake, perhaps the flourless type. But then I learned we ran out of chocolate! Ugh! Bordering on a nervous breakdown, I grabbed the remianing bottle of brandy on the pantry and opened my aunt's moldy recipe box. I was hoping to come across a recipe calling for copious amounts of alcohol. I was not disappointed when this old acquaintace popped out of the files.

This cake brings back memories of the 80s. Not that I am capable of remembering much of it! LOL! Not many bake shops offered this cake during those years, at least not Red Ribbon and Goldilocks, but mostly specialty cake stores and hotels instead.

The texture of this cake is reminiscent of a fluffy Food for the gods, yet has some other-wordly characters to it. The cake is typically doused with quality brandy before being iced with a prune buttercream. The prunes are really sweet, yet they retain a fruity flavor, unlike dates. It is a truly indulgent treat!


A picture of the recipe shows that the index card where the recipe was written may even be older than I am. Reading it is even more disturbing: the person who came up with this recipe is so obsessive-compulsive that she calls for 2 1/4 teaspoons baking powder, 3/4 cup evap + 1 tablespoon vinegar. I rounded off all ingredients to the nearest whole or half.

Cake

Prepare the prune paste: chop 1 1/2 cup of prunes and boil with 1/2 cup of water (or more) and 1/4 cup brandy. Add more water or brandy so that liquid barely covers the prunes on the pan. Simmer until half of this liquid has evaporated. Turn off heat and let cool, mixing occasionally. The prune pieces will soften, and remaining liquid will evaporate as it cools. Cool completely.

Preheat oven 350 degrees.

Line pans with parchment. Alternatively, you can butter and flour the pans instead. To make a large cake, prepare two 9-inch cake pans to end up with two 9-inch layer cakes. I prepared two 6-inch deep pans instead to come up with two medium-sized cakes.

Sift together the dry ingredients: 2 1/4 cups cake flour, 2 teaspoons baking powder, one teaspoon baking soda and 1/2 teaspoon salt (I reduced the amount because I used salted butter). If you like nuts, toss in one cup of toasted chopped walnuts. Set aside.

With an electric mixer, beat 1 cup butter with 1 1/2 cups sugar (I used only one cup as I already found the prunes sweet). Beat in eggs one at a time until mixture is light and fluffy. Add one teaspoon of vanilla and two tablespoons brandy.

At low speed, add the dry ingredients alternating with the wet ingredients. I started with 1/3 of the flour mixture, then one cup of sour cream plus one tablespoon lemon juice (or vinegar, as the original recipe calls for). Then I added another third of the flour mixture, then one cup (only!) of prune paste, then the remainder of the flour.

Pour into pans and bake for 45 minutes or until toothpick inserted in the center comes out clean. Cool cakes on pan for 15 or so minutes before turning over on a rack. Cool completely before icing.

Cakes can be stored in the freezer if wrapped tighly in plastic wrap.

Icing

Instead of pure butter, I used one cup of butter and another cup of cream cheese. Beat these with a mixer and add the remaining 1/2 cup of prune paste. Add in two tablespoons or more of brandy. I then mixed in one and a half cups of powdered sugar. I should have added three cups of powdered sugar of a full and stiff icing, but the thought that diabetes runs in the family got the better of me.

For the small cakes, cut them in half and fill the centers before icing. For one large cake, the two 9-inch layers go on top of each other. Do not forget to brush the layers with brandy before icing! No one should skimp on brandy, especially if they're missing chocolates!

Pasta alla Puttanesca


My brothers and I used to snicker at the name of this pasta. "Puttanesca" sounded the local word for the lady of the night. Lo and behold, this dish IS named just after that. Check this out. I did not know that Italian and Filipino (by way of Spanish, of course) shared more words in common that spaghetti (ispag-get-tee, as pronounced by the natives)!


I saw Martha Stewart whip this up so quickly on one of her shows and thought of making good use of the canned tomatoes in my pantry. I however, used a combination of canned tomatoes (for flavor and sauce) and freshly chopped ones (for texture). A simpler recipe could be found here.


It is really amazing that this recipe is so simple yet so flavorful and filling! It sauced up a whole pound of cooked pasta and most was gone the moment i dished up.


A note about the pasta: cook it about two minutes less than package directions, then add them to the simmering sauce just before it thickens to desired consistency. The remaining liquid and heat from the sauce will cook pasta through and it will even absorb most of that flavorful sauce.


Serve this as a main course with some crusty bread, or as the "starch" dish with some roast meat or fish.

Tuesday, December 11, 2007

Technical problems...again

I'm back from my *free* trip to Hong Kong and will post some pictures of what I ate soon.

I won't be able to post entries until after this weekend. My computer crashed - for good! It will take until Friday to have the memory and hard drive replaced. Then will sort the recovered files after that.

I have a few entries for publishing that was recovered, but I lost more than half when my computer started crashing some weeks ago.

Monday, November 19, 2007

Oyster Omelet

I generally don’t eat oysters, well at least the Pinoy way. People here give them a brief hot water bath then make them swim in a pool of vinegar and chopped onions. To be honest, I have never even tried it. The thought of eating slimy green blobs swimming in vinegar and raw onions is just nauseating. I hate vinegar (but not in pinaksiw, or when vinegar is cooked).

I first tasted oysters in Bangkok. In Thailand, almost everything is served swimming in chili and I thought it was an appropriate time to be adventurous. We were at a Thai-Chinese seafood restaurant and were served a plateful of oyster omelet on a sizzling platter. It was buried in a mound of julienned leeks and served with some chili paste. I actually enjoyed it, and could not believe myself. The chili and onions (!) helped initially, but I soon realized the egg actually stole away the show from the oysters. And the little blobs weren’t slimy at all. It became one of my favorite Thai/ Chinese dishes.

So, confronted with a mound of fresh oysters, I decided to make some omelet:

You can buy oysters on the shell or get the ones from the market shelled. Whatever the case may be, you need them shelled, cleaned, rinsed and briefly doused with hot water. You will need 1 cup of oyster meat. Strain then set aside.

If the oysters are “leaking out” some juice, add this to three eggs and beat until combined. Otherwise, substitute three to four tablespoons chicken stock. Season with some pepper and salt.

On a VERY HOT oiled pan, preferably non-stick, add a tablespoon of chopped garlic and two slices of ginger that have been slivered. You may adjust the proportion, but this dish is usually garlicky. Dump in the oysters (DO NOT include any water dripping from the oysters) and toss briefly. The pan has to be H-O-T so as not to make the oysters sweat, otherwise this will turn into a stew. Toss for around 20 to 30 seconds.

Lower heat to med-high, then pour in the eggs. Let the bottom part set before mixing. We are not making a pancake or the western omelet. This is more like scrambled eggs. It is difficult to give an amount of time, but you have to inspect the eggs for the doneness that you prefer.

Serve garnished with julienned spring onions, coriander leaves and chili sauce.

Saturday, November 17, 2007

Fried Rice

(leftover steamed rice works best for fried rice.)

It is so easy making fried rice. Not to mention the fact that it is the best way to use up leftover steamed rice!

Leftover rice works best for several reasons. First, because this is relatively dry and will absorb most of the seasonings you put. Second, the rice grains are much easier to separate once they have cooled.

You can use whatever leftover meat or fish or even vegetables as the flavoring for your fried rice. But I usually use fresh ingredients when I make some as I like having a “theme” to my dish.

Today, I made some mixed dried seafood fried rice with preserved mustard and mushrooms. Quite a long name, only because I named almost everything that’s in it!

I a small saucepan I boiled some dried seafood: shrimp, scallops and cut up dried squid (make sure you use the skinless “premium” dried squid or don’t bother at all!). I also tossed in some dried mushrooms. I find it easier and less messy to cut up the squid and mushrooms using kitchen shears prior to boiling. Add enough water to cover and boil for 30 minutes or so, just until the scallops fall apart into threads and the other seafood are tender.

Drain seafood and cut up the shrimp into small bits. You can boil off the rest of the liquid until you have around ½ cup.

For this dish, I also used up some preserved mustard. I refuse to call them pickled mustard as some Pinoys would translate “burong mustasa” as such. Firstly, they were not preserved in a sour liquid. Nor were they fermented. Rather, they are merely salted and allowed to “cure” for a couple of days.

Remove mustard from the bottle, rinse with water and squeeze. Then cut them up to small pieces.

I a large wok, heat around 2 tablespoons oil. I prefer using a non-stick pan as this would consume less oil. Sauté 3 cloves chopped garlic, one thumb-size piece of ginger chopped or cut into slivers, one medium onion sliced. Sauté until fragrant. Add the boiled dried seafood and the mustard. You would need around two to three tablespoons dried seafood and around the same amount of chopped mustard. You need to cook the mustard until its color has changed to a bright green, around a minute.

Add in three to four cups leftover steamed rice. Mix thoroughly. Season with one tablespoon chicken powder (substitute chicken bouillon cube), two tablespoons oyster sauce or soy sauce and some pepper. Add also some of the cooking liquid from the dried seafood. If using a bouillon cube, dissolve it in this liquid prior to adding. I never add salt as the previous two are already salty. Stir fry until well-mixed.

(pardon the funky chopping board - I just borrowed my mom's.)

(preserved mustard should be rinsed to remove its saltiness prior to cooking.)

(saute ingredients before adding the rice and other seasonings.)

Friday, November 16, 2007

Mango Cream Pie

(this pie needs to be chilled well as it melts at room temperature.)

Mango cream tart

My mother just could not resist leaving Conti’s without buying a cake. I got her to grab the mango cream tart as we’ve never tried their version before. We have always been crazy for anything mango. In fact, during the height of Red Ribbon’s 80s success, we would always buy their mango cake, mango cream pie and mango tart.

In case you’re wondering, we did not pick the Mango Bravo (although I had to convince my mom from doing so), because I have serious issue against this thing. No, I don’t have allergies to it. But I think it does not have any right calling itself a “cake.” It is merely a toasted ground-nut meringue, iced with cream and decorated with mangoes. And oh, they put chocolate syrup on top! Sacrilege!!!

To my disappointment, their mango cream tart was just, well, mango cream in a tart shell! I was expecting something more elaborate – just like the ones at Red Ribbon. (I don’t know if they still have it.) The ones at Red Ribbon had a shortbread crust, a layer of pastry cream, I think it also had a bit of whipped cream, then a layer of mangoes, and lastly a layer of gelatin.

Today, we had some over-ripe mangoes and someone had to intervene! I did not have much time, so I made my mango cream tart in the fashion of Conti’s, but of course, mine tasted better and less commercial.

Shortbread Crust
Preheat oven 350°F.

In a bowl, mix together 2 cups flour with ½ cup confectioner’s sugar and a pinch of salt. Add in ¾ cup melted butter. Mix until mixture comes together. We are not making a traditional pastry crust here so we don’t have to worry about cutting the butter – that is why we add it in melted. This is not a flaky crust.

Press on a tart pan (8 or 9-inch round pan) and bake for 20 - 30 minutes until edges begin to brown, and surface is lightly browned. Cool on pan.

For the mango cream tart, you need to

Filling
Make some pastry cream: on a saucepan on medium heat, scald 2 cups milk (you can use half and half, or even all-cream). Add sugar (usually ½ cup or more, depending on how sweet you like it), and also around two tablespoons of powdered gelatin. Be sure to mix the gelatin with the sugar before adding them, or the gelatin will clump together.

Meanwhile on a bowl, beat together three yolks and one whole egg. When milk is about to boil, pour the milk over to the eggs while whisking to prevent them from coagulating. Pour this mixture back into the pan. Now switch gears to a wooden spoon and mix constantly until this mixture thickens to coat the back of a spoon. When thick, remove from pan and pour onto a bowl. Stir in ¼ cup of cold butter. This will help cool the mixture. Continue stirring until combined. You may also add in one teaspoon of vanilla extract. Cool completely.

When custard is cool/ room temperature, whip one cup of very cold cream until fluffy and doubled in volume. Fold in the custard. The gelatin in the custard will “gel” the whole mixture together.

Pour this mixture on to the chilled crust. Chill. When completely set and firm, decorate top with some sliced mangoes.
(press the crust on a pie plate and bake until golden and cooked through.)

(when shell is completely cooled, pour in the filling and decorate with sliced ripe mangoes. Chill until set before slicing.)

Wednesday, November 14, 2007

Garlic Chicken Wings

(this dish has tons of garlic! but also with an Asian twist.)


Garlic lover’s Buffalo wings – that is the best I could describe this dish. This is an Asian take on that spicy chicken dish, especially for people who cannot tolerate that much heat. This dish however, is not really that mild – the flavors are strong with all that garlic and coriander stems and leaves. You can even had hoisin sauce for a stonger Asian flavor. But the combination of garlic and oyster sauce works best for me.

You can leave out the coriander if you happen not to like that herb. The sauce can be stored in the refrigerator or freezer. It keeps in the ref for around a week, but the coriander flavor overpowers the garlic towards the end of several days.

Chicken
You can marinate one kilogram chicken wings or parts in a marinade similar to that for the buffalo wings, or leave it seasoned with salt and pepper.

Dredge the chicken pieces lightly in some cornstarch and fry until cooked through. Drain on a paper towel.

Sauce
Combine together the following ingredients: one tablespoon minced fresh garlic, one tablespoon chopped fresh coriander/ cilantro, two tablespoons good quality oyster sauce, one teaspoon sugar, one teaspoon lemon juice, one teaspoon freshly cracked black pepper. You may also add about one tablespoon of hoisin sauce.

Mix sauce ingredients thoroughly. Toss the hot wings or chicken parts into the sauce to coat evenly.


(season and fry the chicken parts however way you want, but leaving it a bit on the bland side is probably best so that the garlic sauce has no other flavor to compete with.)


(I made the sauce a few days ahead when i had an abundant supply of coriander/ cilantro, hence the stems and leaves have lost their bright green color, but not their flavor.)

(toss the fried chicken with the sauce to coat evenly, then serve.)

Tuesday, November 13, 2007

Cinnamon Rolls

(Moist sweet rolls of bread perfumed with cinnamon.)


I know I swore never to come anywhere nearer than 10,000 miles of a cinnamon roll. Yes, I just hate stale (or at least dry, as you get them from food stores) bread stuffed with a gargantuan amount of cinnamon it overpowers even the tons of sugar glaze it swims in.

But I am not a hater of all bread that is rolled. I just don’t like the way most shops and people make their cinnamon rolls. It is either too sweet, has too much cinnamon, or the bread is plain thrash.

Like what I previously said, I do make my own rolls and more often than not, I fill them with stuff other than cinnamon sugar, like monggo (azuki or red beans) or apples.

So why did I finally decide to make plain old cinnamon rolls for only the third time in my life? Because, I chanced upon Peter Rheinhart’s recipe for it (here and here), and I have been dying to have his book for a very long time now (There, for all those who would be buying me something this December, here’s an idea. I pledge a year of baked goodies to whomever will give me a copy.) The recipe was taken from The Breadbaker’s Apprentice – Reinhart’s award-winning book.

The concept put forward in the recipe – that cinnamon rolls and sticky buns are two DIFFERENT entities has really won me over. On the one hand, you have a roll perfumed with cinnamon with an ample amount of sugar glaze that balances the cinnamon’s perfuminess. On the other is a roll bathing in caramel and nuts with no cinnamon to confuse its taster. And yes, the ones we see at malls and bakery fairs are the bastardized cinnamon rolls bathing in caramel! Also, Reinhart’s addition of lemon zest to the dough gives it a fruity aroma.
I made cinnamon rolls and I urge you to try one of his versions. I’ll be making sticky buns in the coming days.

(Leave enough space in the pan for rising.)

(The rolls are fully risen when the sides begin to touch each other.)

(It isn't burned! It really is a deep brown. Some glaze will conceal it later.)

(The amount of glaze looks a lot but it will "flatten out" as it dries, if you get what I mean. You can always peel off the dried glaze later on.)

I'm Back!

Nope, my internet connection is still a bit iffy but i will at least try and post on this blog whenever I can...I never stopped cooking and experimenting and I have some interesting recipes coming. Stay tuned...

Thursday, October 25, 2007

Indisposed

I have not been posting for a long while! I was down with a flu for an entire week some time ago. Then my connection went bust. My server is apparently in the middle of fising some cables and antennae.

Stay tuned for more posts. I have been typing many of my experiments and will post them when the system clears. I still takes an eternity just to load a single pic. And this is the third time I am attempting this post. Hopefully I won't be given the "error" message when I hit "publish."

Tuesday, October 9, 2007

My airport is slowly coming to life...


With a few more details, I will finally be able to complete my airport diorama. I reached a milestone yesterday when I completed the main terminal building. I will soon link this to my satellite terminal, which I earlier made.
I would only need to draw my airport matt and buy some accessories and I will have a completed airport in the 1:500 scale.

Tuna a la pobre

Fish Steaks in Garlic Oyster Sauce
(oyster sauce gives this dish an Asian twist)

This is a really quick and simple recipe for any fish steak or fillet you have. You can marinate the fish steaks ahead of time, or leave it without any seasoning until the very last minute prior to cooking when you season it with some salt and pepper.

My grandmother makes this dish a lot when we get fresh tuna or salmon steaks from the market. The sauce also works well with lightly stir-fried shrimp or fresh mushrooms lightly sautéed in butter.

Fish
Marinate fish by rubbing with this mixture: salt, pepper, garlic and lemon juice. I typically use a wedge of lemon and a clove or two of garlic for every piece of fish steak. Again, you can leave the fish unseasoned until the last minute when you sprinkle it with some salt and pepper.

Heat up a skillet to med to med-high heat. Grease pan with two tablespoons extra virgin olive oil. Fry the steaks until half done. It usually takes 30 secs to one minute on each side, depending on the thickness of your steaks. You only want to give color to the fish and not cook it at this point.

Sauce
On the same pan, sauté some garlic (around three to five cloves, chopped for every steak) until lightly browned in some butter (add a tablespoon for every steak). You may drain the excess olive oil prior to adding the butter if you think there is too much. Season with some pepper and lemon juice. Add around a tablespoon of good quality oyster sauce for every steak, and around a tablespoon of water or stock.

You may add back the fish and gently cook until medium-rare. The fish will continue to cook with the residual heat on the sauce and plate. Let rest five minutes prior to serving.

Best enjoyed with white steamed rice or a crusty baguette.

Daing na Pusit (dried squid)

Comparative Anatomy: Imported vs Local
(the ones i get from HK are much "sweeter" in flavor - it does not have any of that bitterness.)
Though I am crazy for everything squid, I have never liked “daing na pusit” – dried squid fried in boiling-hot oil. It is too salty and slightly bitter. Perhaps because it cooks and toasts quickly, the adherent skin always ends up slightly burned. Then it is eaten dipped in vinegar – my arch enemy! (but I do eat paksiw! And cook with it to come up with sweet and sour stir-frys!)

One December morning, while on a hunt for dried shrimp and preserved pigeon legs at Des Voeux Road, Central, Hong Kong we chanced upon a stash of so-called “premium” dried squid. I was told it is special because of the extra cost of labor of having to skin them individually prior to drying. I bought one catty to bring home to Manila. That began my love affair with this dried seafood.

When raw, it has an ivory-beige color. Fried, it has a golden color (not brown) and sweeter taste compared to what we get locally. Crisp, but not as salty or burnt-flavored as the local variety. And it does NOT curl up on cooking!

It is also good cut up finely or otherwise (I use kitchen shears) to flavor seafood broths. The local type simply will not work as it will only impart a fishy bitter flavor.

I am still dumbfounded why no one has thought of making this locally. Skinning the squid takes it to a level of its own in the dried seafood world!

I bought a kilo of this goodie and ran out of it in less than a month!

(the local version is always dried with its skin on, making it slightly bitter when fried.)

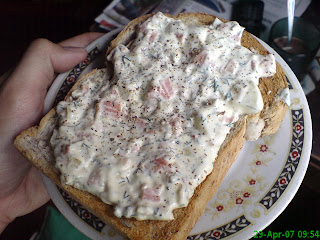
Smoked Salmon Spread

(best served over toasted bread)

Smoked salmon, an imported product has been available locally for years! Yet few seem to appreciate it. Not all major groceries have it, or at least keep large stocks of it. One would think that these groceries keep it for the expat community. Perhaps it is because Pinoys know that temperate-water fishes have that oily fishy flavor – the type that not only gives you bad breath that people around you can smell, but the breath you belch all day, intoxicating just about anyone who comes within three meters of you. Smoked, salmon is several times more oily and fishy than its natural raw state.

Yet, through all these years, smoked salmon has become more and more available, albeit in still limited quantities in a lot of groceries. Some of the local European style sausage manufacturers like “Swiss Deli” have their own smoked salmon. For years, Santi’s Deli has had its smoked tanigue.

Having seen Ina Garten in Barefoot Contessa do a spread with smoked salmon, I thought of trying out her recipe. But I had to think long and hard how to squeeze the fishy-ness out of this oily fish!

I laid out the smoked salmon slices on two sheets of kitchen towel, and covered it with another sheet. I let all the oil drain out for about 10 to 15 minutes. I know the Europeans will cry sacrilege with this, but really, most of the smoked salmon we get are too oily and fishy for our taste. You can skip this procedure depending on how much you appreciate fish oil.

I like using the Swiss Deli brand of smoked because it is not too salty and tastes and feels fresh after all that oil has been drained out. Other brands tend to have some liquid in it, making it even fishier! The Santi’s Smoked Tanigue works well with this recipe, too as it is not oily nor juicy.

On a mixing bowl, cream a whole bar (8 oz) of cream cheese with a tub (~1 cup of sour cream). Add in a finely grated small red onion. (chopped if you like them chunky). Season with salt and pepper, about two tablespoons of lemon juice, half a teaspoon Worcestershire sauce and a few drops of hot sauce (Tabasco). Taste the mixture. It should be slightly sour to offset the saltiness and the fish flavor. For a more lemony taste, you can add the zest of half to one lemon - depends on how “fragrant” you want this to be.

For some texture, I usually add in two chopped hard-boiled eggs. The yolks I mash with the dressing. The whites I chop and add later with the salmon.

Next, add in around three tablespoons of chopped fresh dill. They come in small packs in the grocery and I usually add all the chopped dill leaves this pack will yield – usually between 2 – 4 tablespoons. Don’t include the stems as they are woody! Dill adds a certain fresh flavor to this spread. Its fragrance reminds me of McDonald’s Fillet-o’-Fish!

Cut up the fish into small cubes, but do not chop! Handle them gently! Chopping or “mashing” them will release juices and make it taste “off.” Add the fish to the dressing and fold gently.

Serve over toasted bread!

(i make sure to remove all the fishy oil from the salmon fillets with the use of paper towels)


(store in an air-tight container)

Scallop Cakes


(scallops - instead of crab - give this a more delicate texture and flavor.)

I previously made some prawn cakes and posted the recipe in this blog. It was inspired by Nigella’s very simple version (Forever Summer with Nigella), but of course I had to add some flavorful herbs to pull it up to my standards.

I could not find (for the past three months) any raw crab meat on the market. But there have been a lot of fresh frozen scallops. So I thought I would try substituting these for the former. Of course, it still had some prawns to give it texture and body. The result was a more delicate seafood “cake.” They were softer with a much sweeter flavor. Do make sure your raw seafood is very fresh, or was frozen fresh.

(blitz the herbs ahead of the seafood to ensure you can control the texture of the meats. this is around 70-80% scallops with the remainder being prawns/ shrimp)
(it is softer, compared to prawn cakes)

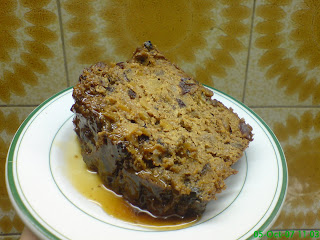
Fruitcake...Five years old

(even after all that time, the cake had remained moist, but not soggy, perhaps because i doused the cake every four months or so with a bottle of rum.)

About 5 years ago today, I made this fruitcake while on sem-break during my freshman year at medical school. I graduated last year. I passed my licensure exams two months ago. And this fruitcake is still in my ref. No, it is not spoiled. It is actually delicious and quite intoxicating!

I had no intention of curing this cake this long when I baked it. I was trying out several fruitcake recipes that time and this was my third one, and the one that beat the other two. I used only dried fruits that were soaked in red wine for this recipe, and none of the candied citron peel that people still call candied dried fruits (ehem, it’s actually the PEEL of only ONE fruit). Being the third cake of the same category in a period of 10 days, people at home were pretty tired of fruitcake, a good two months ahead of the Christmas season. So I cut up the cake, placed it in an air-tight container and drowned it in a full liter of rum and cherry brandy. See you on December 25, I said.

I opened the tub on Christmas day and a waft of sweet fruity alcohol greeted my nose. The most of the liquid had evaporated and somehow escaped and the cake was now sitting on a puddle of brown syrup. I took as slice and tasted it. It was sweet but still had a very strong alcohol taste to it. The syrup, on the other hand was heavenly! It was as if I were licking fruity honey, with a hint of rum! Superb! But thinking the alcohol taste was still too strong for the octogenarians in my family, I put back the lid and saved it for New Year’s.

I forgot about this cake, until around February. The cake had aged and developed a sweet fruity mellow flavor. But there was no one to appreciate it. Everyone was tired of fruitcake. So I got a new bottle of rum, poured everything in and stored it in the ref again. This cycle went on for the next years, with me pouring a new bottle every four to six months.

It had survived all these years! The flavor had remained the same, perhaps preserved by the copious amounts of alcohol. And it wields the utmost fruitiness because I only used dried fruits – dried apples, pears, apricots, cherries, golden raisins and blueberries. I also added some walnuts and pecans. Surprisingly, the texture is quite good, too. The area that remain soaked in syrup was a bit soggy, but the upper areas were soft and moist!

I’ll be posting this recipe soon. (I obviously need to search my files as I haven’t done fruit cake in years!) I’ll be doing a fresh batch of fruitcake that I’ll store and eat perhaps when I finish residency training! Haha!

(the cake had developed a brown syrup - ffuity and intoxicating- made from semi evaporated rum.)

Friday, October 5, 2007

Two-Face Pizza

(best of both worlds: the humble vegetarian on the left, the elitist carnivore's pizza on the right)

For several rainy days last June, I found myself stuck at home – hungry but not really wanting to build up all that fat. So I thought of making bread, from scratch. Kneading BURNS calories. Believe me, it IS a good workout! I would have burned all the calories I was to accumulate after the feasting.

And yes, I decided on a vegetarian pizza just so I could keep on track with the “healthy eating” theme. But I had to appease the carnivores at home as well. So I made an imaginary line on the tray and made a two face-pizza.

Dough
This is the same Focaccia dough I used for my other veggie pizza.

Veggie Toppings
Unlike the Veggie pizza I made for my birthday, this one does not have any mushrooms. There is the complete absence of any meaty flavor. But a trio of flavorful cheeses more than makes up for that!

I basically smothered the dough with the same tomato pesto for the first veggie pizza. I laid down slices of onions, tomatoes, sliced black olives and zucchini. Then I added a bunch of sliced romaine lettuce. Then I sprinkled a trio of cheeses: parmesan, mozzarella and feta. The crumbled feta has a very strong creamy but salty flavor. I think feta deserves its own pizza. Any meat would have stolen the show.

Prosciutto and Blue Cheese
This is my take on the ham and cheese pizza. But of course, with the elitist gourmet twist! We are not adding plastic pepperonis and artificial ground meat like most fast-food meatlovers’ pizzas.

On the same dough smothered with tomato pesto and herbs, I scattered a few slices of onions. Then, I sprinkled it with some chopped Prosciutto di Parma – the legendary Italian ham. It has a very strong salty-porky flavor, so I chopped only two thin slices. Then I crumbled around a tablespoon or two of blue cheese. Then loads of mozzarella. That is all there is to it.

Bake and serve.

(two-face pizza)
(the carnivore's never noticed the absence of meat - the lettuce leaves are even showing through!)