Showing posts with label cakes. Show all posts

Monday, April 28, 2008

WHITE!

After going green, I'm going white! Whatever that means!

Anyway, I realized I've done many different types of chocolate cakes, many before the age of blogging but I have never done any cake in white!

I initially thought this was a tricky cake, since white chocolate is plain fat and milk protein without the chocolate solids. I mean a few tablespoons of cocoa powder into a cake batter will turn it into chocolate cake, but figuring out how much butter and/ or liquid white chocolate will replace is far more tricky.

Luckily, I found a recipe on the internet. I gave it a try and the results were okay. I used sour cream, by the way instead of buttermilk.


The cake came out okay. It was dense and rich and buttery. It wasn't as dense as an olive oil cake but still a bit dense for me. Perhaps I wasn't too careful in folding the batter because on slicing, it revealed some dense 'unpuffed' areas. The taste was okay, too. The milky vanilla flavor dominated. Well, white chocolate doesn't have its own flavor anyway.


For the frosting I made a simple buttercream with one cup butter, 4 oz melted white chocolate and 1/4 cup cream. I added one cup of confectioner's sugar. The icing came out lumpy as I think it needed more sugar. But I would rather have it this way than add make it sweeter.

Let's Go GREEN

I just LOVE green tea! I think it is refreshing and sweet, unlike regular black or oolong teas which may often taste bitter. And the fruit infusions taste like car fresheners (not that i've tried some). Green tea, just like any natural drink or food is rich in vitamins and minerals and antioxidants. People in Japan believe drinking it everyday helps keep colon cancer away. Of course, studies have shown that you need to drink industrial quantities daily for it to have this effect. Then again, drinking it is way more nutritious than plain water and definitely healthier than other bottled or canned drinks (yes, teas come prepared in soda bottles and cans in other countries!).

You either like it or you hate it. I have a lot of friends who always order all things green tea in restaurants. On the other hand, my aunt who spent two years of her life as a missionary in Japan swears that green tea tastes and feels like warm horse saliva. I do not want to imagine how she came up with that comparison.

With the green tea theme in mind, I am posting two recipes I made previously with green tea. I used green tea powder I bought some time ago in Hong Kong. I know a lot of the local Japanese stores have it. This green tea is the one used in the ceremonies and is called 'matcha.' I am not quite sure if regular dired green tea leaves pulverized in a spice blender would work quite as well.


I got this recipe for Green Tea Layer Cake online. I did not have yogurt at that time so I used sour cream. The cake came out quite dense, but still soft and very flavorful. The combination of vanilla and green tea gave a flavor reminiscent of Green Tea Frappucino!

For the frosting, I reduced the amount of sugar by half, as I do not like my desserts too sweet. I divided the frosting into two. One part I mixed with some mashed azuki (boiled mashed red mung beans) and used it for filling. The other half I used to frost the cake.


With some matcha leftover, I then made some green tea butter cookies (sable). I think my oven temperature wasn't right as the edges have already browned and the centers were still a bit puffy. (My oven isn't calibrated.) But they tasted good! The cookies were buttery, as are all sables, and had the perfuminess of green tea.

Thursday, April 10, 2008

Chocolate Cake with Cherry Filling


Sometimes it is the simplest things that are the most elegant. - Ina Garten


Your are free to accuse me of not being creative in coming up with a name for this recipe. It is no "decadent blah blah," or "rich and moist blah blah." I hate pretentious cakes. This is what it is - a simple chocolate cake with a cherry filling. And yes, this is another product of the leftovers and nearly-expired stuff I collected from my freezer and pantry. The Peotraco cocoa powder survived Christmas, New Year and Easter in my pantry, but did not last longer than three days after being made into this cake. (Three days is long for glucophobic people like us.) And you may have guessed also that the cherry pie filling was also plucked out of the bowels of my freezer.


I wanted a 'light' chocolate cake (as if such exists) for this project so I decided on using a Devil's food cake recipe (aka old-fashioned chocolate cupcakes). I removed that extra half-cup of sugar, of course. The cake ended up 'light' (read, not dense) and fluffy, but still moist - perhaps because of the two(!) cups of refined sugar added.

I tweaked the cherry pie filling a bit by heating it with one tablespoon each of lemon juice and brandy. You may want to add some sugar if you find the cherries too sour, but do not omit the lemon juice. Believe me, it will mask the 'canned-taste' (or 'freezer-taste,' in my case).


After cutting the cake in half, I then doused it with more brandy before pouring the filling.

I used a chocolate buttercream to ice the cake. You can search then net for a chocolate buttercream recipe, but i simply used equal amounts of creamed butter and the chocolate condensed milk icing my family typically uses for traditional chocolate cakes. (Scroll down this previous post and the recipe is somewhere there.)

Wednesday, March 12, 2008

Cream cake


Armed with leftover sponge cake frome my previous project, I decided to make some cream cake, or whatever you'd call this cake layered with cream/ pudding the the tradition of trifles.

I layered the sponge cake with the cream filling.


I made the cream filling by folding in 2 cups of custard which I made from an instant mix. It is actually used quite a lot in Hong Kong for making desserts, and even breading some meats!

I followed the instructions on the back of the can. While still warm, I mixed in around a tablespoon of butter. After it has cooled completely I folded in one package of cream that has been whipped. Lastly, I added some diced mangoes.


It is best to refrigerate this overnight so the cream will set. It doesn't tolerate heat well.

This dessert is really quick and simple, and you can fold in whatever fruit you like. The cream and sponge are both very light and airy.

Monday, March 10, 2008

Cheesecake with sponge crust


They say there are only three general types of cheesecake - New York style, Italian and Japanese. (Yes, I agree that frozen or no-bake cheesecakes are mere flans!) New York style is dense and rich and relies on industrial amounts of creamcheese, with the traditional Graham cracker crust. Italian uses mascarpone. Japanese, on the other hand is more like sponge cake, but made with creamcheese. Others contest that there are more.

So when I recently bought some European creamcheese (which for some reason I thought was Danish) at the supermarket (the usual brands were out of stock), I was rather intrigued on reading a cheesecake recipe calling for a sponge cake crust! (I later googled "danish cheesecake and it seems that the Danes use either bread for cheesecake crusts!)

Further, on opening the package at home, this French creamcheese was a bit less watery than the American brand, and less sour, too. It was sold in boxes of 200g as opposed to 225g (American).

The recipe called for only one creamcheese to I thought it was worth a try.

Kiri Chef (brand) Baked Cheesecake

Line springform pan (18cm) with parchment paper. Preheat oven 325*F.


Line the bottom of the pan with a 1cm-thick sponge cake. (I baked the sponge cake in the same pan the day before. I used a simple sponge cake recipe - more like lady fingers instead of the traditional sponge cake.)


In a bowl, cream 200g creamcheese with 70g icing sugar and the zest of one lemon (I used orange). Add in 150g sour cream, 2 eggs, 20g cornstarch, 150g cream, and 10g lemon juice (I used orange as well) mixing well after each addition.

Pour the mixture into the prepared tin and bake for 60 minutes.


After baking for an hour, the cake comes out puffy. Let cool completely on the pan set on a rack. Chill before unmoulding.


I put the cheesecake in the refrigerator overnight to allow it to completely set, before I unmoulded and sliced it. It developed a crack while cooling. This is normal for cheesecakes.


Variation: you may add 30g dried raisings soaked in rum and 30g toasted pine nuts into the batter.

The sponge I used was rather dry (expected as it was designed for making trifles), but had become moist as it steamed during baking. The cheesecake layer was creamy and rich. It was not as dense as the New York style, but was a bit softer. I quite like it as the cheese layer was a melt-in-the-mouth experience!

Sunday, March 9, 2008

Pear Upside-Down Cake

What to do with a stash of ripe fruits? Make cakes... upside down cake!

I had a stash of D'Anjou pears in my refrigerator, and they were already quite ripe. I have been having these pears for several straight weeks since they first appeared in the local market. So I had to use them, rather than let them go bad. I am not tired of these pears, I'm just salivating at the sight of Philippine mangoes (carabao mango) I haven't had for weeks. Believe me, I am as much a fan of Red D'Anjou pears as much as I am of Philippine mangoes.

I first came across these red pears during my stay in Munich (2006). I used to have them everyday for breakfast. They were sweet, juicy and somewhat soft compared to the Japanese and Korean pears. Above all, it had a perfumy quality - the smell and taste of this pear was quite strong compared to the Asian pears. It's aroma rivalled that of a musk melon (in intesity, not the actualy scent). It was like none I've eaten before! I first bought a few, then bought kilos after I've tasted them. I never found out the name while in Germany as the storekeeper near my apartment never spoke English. I had to search for it on the internet. So it was indeed a blessing when these appeared in the local supermarkets.

So off I googled and searched for a pear cake recipe and what came out were upside-down cake recipes. I adapted the one I got from marthastewart.com.

The upside-down cake I grew up eating were the pineapple ones my grandmother always bought from Princess Delan's, or those she made herself. That bakeshop was a small store in our town, and sad to say it closed down already (unless they relocated). The pineapples they used were tart, but was bathed in an overly sweet dark brown syrup, and accented with some cinnamon. The sweet and sour flavors cancelled each other, but it was an explosion of flavors, nonetheless. How can a kid not like that? Its cake base was, like most commercially-made cakes, was light, fluffy but rather dry. The syrup was supposed to help. The cake bought from the store wasn't the best, at least for me (and I know many will disagree), but it was a fun and interesting cake and definitely better than any birthday cake from any party, even my own.

Since I didn't have pineapple on hand (and I'm not a big fan of the fruit anyway - unless eaten fresh in its purest form), I decided to use the stash of pears ripening in the ref, and this cake, I thought, was one of the best ways to use them.

I thought the vanilla in the batter wasn't the most appropriate flavoring as it might come in conflict with the perfuminess of the pears. Instead, I added the grated zest of one lemon plus one teaspoon of finely grated fresh ginger. I thought of adding ginger since some recipes I came across added dried ginger and molasses. I'm not a fan of molasses, so I never gave those recipes a second thought. Ginger, especially when fresh accents the freshness of the fruits and actually complements the lemon flavor. I always use fresh instead of dried as the latter sometimes tastes "off."
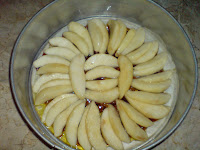


Following the recipe, I arranged the pear slices on the bottom of a pan with the topping. By the way, I tossed the sweet pears with the juice of a lemon prior to arranging them. What better way to use the zested fruit than trowing it away?


The batter, even after folding in the whites was rather thick and dense. I was really concerned, but the cake came out soft and moist. Not as fluffy as a sponge cake, but moist and crumbly enough to require a fork when eating it.

I quite like this cake, and would definitely make this again, with pears or other fruit. It is good served warm or cold. Perhaps, when I need a break from my mangoes, then I will try and make a Mango Upside-down cake!

Saturday, December 22, 2007

Brandy Prune Cake


I was craving for something decadent the other day and was actually planning on making a really rich chocolate cake, perhaps the flourless type. But then I learned we ran out of chocolate! Ugh! Bordering on a nervous breakdown, I grabbed the remianing bottle of brandy on the pantry and opened my aunt's moldy recipe box. I was hoping to come across a recipe calling for copious amounts of alcohol. I was not disappointed when this old acquaintace popped out of the files.

This cake brings back memories of the 80s. Not that I am capable of remembering much of it! LOL! Not many bake shops offered this cake during those years, at least not Red Ribbon and Goldilocks, but mostly specialty cake stores and hotels instead.

The texture of this cake is reminiscent of a fluffy Food for the gods, yet has some other-wordly characters to it. The cake is typically doused with quality brandy before being iced with a prune buttercream. The prunes are really sweet, yet they retain a fruity flavor, unlike dates. It is a truly indulgent treat!


A picture of the recipe shows that the index card where the recipe was written may even be older than I am. Reading it is even more disturbing: the person who came up with this recipe is so obsessive-compulsive that she calls for 2 1/4 teaspoons baking powder, 3/4 cup evap + 1 tablespoon vinegar. I rounded off all ingredients to the nearest whole or half.

Cake

Prepare the prune paste: chop 1 1/2 cup of prunes and boil with 1/2 cup of water (or more) and 1/4 cup brandy. Add more water or brandy so that liquid barely covers the prunes on the pan. Simmer until half of this liquid has evaporated. Turn off heat and let cool, mixing occasionally. The prune pieces will soften, and remaining liquid will evaporate as it cools. Cool completely.

Preheat oven 350 degrees.

Line pans with parchment. Alternatively, you can butter and flour the pans instead. To make a large cake, prepare two 9-inch cake pans to end up with two 9-inch layer cakes. I prepared two 6-inch deep pans instead to come up with two medium-sized cakes.

Sift together the dry ingredients: 2 1/4 cups cake flour, 2 teaspoons baking powder, one teaspoon baking soda and 1/2 teaspoon salt (I reduced the amount because I used salted butter). If you like nuts, toss in one cup of toasted chopped walnuts. Set aside.

With an electric mixer, beat 1 cup butter with 1 1/2 cups sugar (I used only one cup as I already found the prunes sweet). Beat in eggs one at a time until mixture is light and fluffy. Add one teaspoon of vanilla and two tablespoons brandy.

At low speed, add the dry ingredients alternating with the wet ingredients. I started with 1/3 of the flour mixture, then one cup of sour cream plus one tablespoon lemon juice (or vinegar, as the original recipe calls for). Then I added another third of the flour mixture, then one cup (only!) of prune paste, then the remainder of the flour.

Pour into pans and bake for 45 minutes or until toothpick inserted in the center comes out clean. Cool cakes on pan for 15 or so minutes before turning over on a rack. Cool completely before icing.

Cakes can be stored in the freezer if wrapped tighly in plastic wrap.

Icing

Instead of pure butter, I used one cup of butter and another cup of cream cheese. Beat these with a mixer and add the remaining 1/2 cup of prune paste. Add in two tablespoons or more of brandy. I then mixed in one and a half cups of powdered sugar. I should have added three cups of powdered sugar of a full and stiff icing, but the thought that diabetes runs in the family got the better of me.

For the small cakes, cut them in half and fill the centers before icing. For one large cake, the two 9-inch layers go on top of each other. Do not forget to brush the layers with brandy before icing! No one should skimp on brandy, especially if they're missing chocolates!

Tuesday, October 9, 2007

Fruitcake...Five years old

(even after all that time, the cake had remained moist, but not soggy, perhaps because i doused the cake every four months or so with a bottle of rum.)

About 5 years ago today, I made this fruitcake while on sem-break during my freshman year at medical school. I graduated last year. I passed my licensure exams two months ago. And this fruitcake is still in my ref. No, it is not spoiled. It is actually delicious and quite intoxicating!

I had no intention of curing this cake this long when I baked it. I was trying out several fruitcake recipes that time and this was my third one, and the one that beat the other two. I used only dried fruits that were soaked in red wine for this recipe, and none of the candied citron peel that people still call candied dried fruits (ehem, it’s actually the PEEL of only ONE fruit). Being the third cake of the same category in a period of 10 days, people at home were pretty tired of fruitcake, a good two months ahead of the Christmas season. So I cut up the cake, placed it in an air-tight container and drowned it in a full liter of rum and cherry brandy. See you on December 25, I said.

I opened the tub on Christmas day and a waft of sweet fruity alcohol greeted my nose. The most of the liquid had evaporated and somehow escaped and the cake was now sitting on a puddle of brown syrup. I took as slice and tasted it. It was sweet but still had a very strong alcohol taste to it. The syrup, on the other hand was heavenly! It was as if I were licking fruity honey, with a hint of rum! Superb! But thinking the alcohol taste was still too strong for the octogenarians in my family, I put back the lid and saved it for New Year’s.

I forgot about this cake, until around February. The cake had aged and developed a sweet fruity mellow flavor. But there was no one to appreciate it. Everyone was tired of fruitcake. So I got a new bottle of rum, poured everything in and stored it in the ref again. This cycle went on for the next years, with me pouring a new bottle every four to six months.

It had survived all these years! The flavor had remained the same, perhaps preserved by the copious amounts of alcohol. And it wields the utmost fruitiness because I only used dried fruits – dried apples, pears, apricots, cherries, golden raisins and blueberries. I also added some walnuts and pecans. Surprisingly, the texture is quite good, too. The area that remain soaked in syrup was a bit soggy, but the upper areas were soft and moist!

I’ll be posting this recipe soon. (I obviously need to search my files as I haven’t done fruit cake in years!) I’ll be doing a fresh batch of fruitcake that I’ll store and eat perhaps when I finish residency training! Haha!

(the cake had developed a brown syrup - ffuity and intoxicating- made from semi evaporated rum.)

Thursday, October 4, 2007

Chocolate Cake

Some pics of the original...

Having just published a blog on sugar-free chocolate cupcakes, it pains me not to pay homage to the original chocolate cake. The recipe is identical, except for the use of brown sugar (I used isomalt for the sugar-free version), and the condensed milk icing I already posted. So here are some pictures of the original cake:

(it is human instinct that if you get smudged with that icing, you just have to lick it off!)

(brown sugar makes the cake moist and dense.)

INDULGE...

It's Guilt-Free!

(why do i like making cupcakes out of cake recipes? simple: portion control!)

Sugar-free Chocolate Cupcakes

Chocolate cake. What more can I say? A soft, moist and fudgy treat that everyone loves! And the best part about these batch of cupcakes I made is that they’re sugar-free!

Over the last few years, I have tried various chocolate cake recipes in search of the perfect one. I have always wanted it soft – but not as airy and fluffy as sponge or chiffon. Maybe more like butter cake – dense enough to hold its moisture and suitable for light soaking in some alcohol. Then comes the perfect icing – rich, fudgy and indulgent.

I grew up eating the rich dark, almost black chocolate cake from Cookie Monster’s Bake Shop. It was so rich and sweet and moist! My father would always buy one whole, eat only a spoonful then give away the rest of the cake! Being a diabetic is never easy!

My aunt makes a similar cake that she makes for me during my childhood birthday parties. It wasn’t as dense as Cookie Monster’s, but equally indulgent because of its rich creamy icing (recipe below). She makes a chocolate chiffon iced with condensed milk icing.

For today, the following recipe is one I modified from Alton Brown’s baking book (Chocolate Fudge Cake). His recipe is a bit weird at first in that he pulverizes the baking chocolate to tiny bits and adds them to the flour. But then it makes sense: the bits melt during cooking and become the “fudge” in the cake. I’ve made this cake several times, and I once added the chocolate melted into the butter. The cake came out okay too, although a bit denser.

This recipe works best with BROWN sugar. If you can’t find a brown sugar substitute, then use the ordinary (white) sugar substitute. I could not find one, so I just used an equivalent amount of regular (white) granulated isomalt. (NOTE: excessive consumption of isomalt may lead to diarrhea.)

No, I do not need to go on a diet. I am not overweight, yet. So why did I make it sugar-free this time? Because my dad has been nagging me to. He IS on a diet.

Cake
Preheat oven 350°F. Prepare cake pans. If making a cake, line a 9x3 inch cake pan with parchment. If making cupcakes, line 24 muffin tins with paper.

In a mixer, combine 2 cups isomalt (or brown sugar/ dark brown sugar if you don’t need this to be sugar-free) and ½ cup butter. Beat until well combined. Beat in two eggs, one at a time, and also 1 ½ teaspoons vanilla extract.

In a food processor, pulverize 3 oz (three squares) of unsweetened chocolate (or baking chocolate for diabetic). Add in the dry ingredients: 2 ¼ cups all purpose flour, 2 teaspoons baking soda, one teaspoon salt and 3 tablespoons unsweetened cocoa powder.

Now add the dry ingredients to the butter and egg mixture, alternating with 1 cup sour cream, starting and ending with the dry ingredients. Mixture will be very sticky. Do not overbeat. Mix only until combine.

With the mixer running on the lowest setting, slowly add in 1 cup boiling water. This will thin out the mixture.

Pour batter on cake pan or muffin tins. Bake the cake at 350 for ½ an hour, reduce temperature to 300 then finish baking for another half hour. Toothpick inserted will come out wet – this is after all a fudge cake! Cake made from white sugar or sugar substitute will not be as fudgy. But cake will be springy when lightly touched. For cupcakes, bake them at 350 for 10 minutes then 300 for another 20 minutes or so.

Remove from oven and cool in pan for 15 minutes before unmoulding. Cool completely before icing.

Icing
Sugar-free: melt two oz unsweetened chocolate, ¼ cup butter and 1 cup milk or cream. Cool. Add in 2 cups icing sugar substitute (isomalt) and whip in a mixer until icing holds shape.

Traditional icing: on a double boiler, mix together one can (1 cup) condensed milk, 1 cup fresh milk or cream, three oz unsweetened chocolate, and three tablespoons. Cook until thickened (same consistency as the condensed milk before you added it.), stirring occasionally. This usually takes around 45 minutes to 1 hour when using a double boiler. Cooking time is excruciatingly slow, but is not prone to overcooking or burning. I usually cook this over direct flame – low-medium, and with CONSTANT vigorous stirring. It’s a nasty workout for your arms but cooking time takes only 15 or 20 minutes.

I usually make big batches of this traditional icing and store them in the freezer.

To ice the cake, cut cake in the center and fill with some icing. Spread the remaining over the top and sides.

To ice cupcakes, spoon icing over top and spread.

(let the cupcakes cool on the pan a few minutes prior to unmoulding.)

(moist and fluffy - not bad for something sugar-free!)

Friday, September 14, 2007

Coconut Pandan Chiffon Cake

Coconut Pandan Cupcakes

This recipe is very Southeast Asian. And I believe it is one of the few recipes that uses authentic Southeast Asian ingredients in a successful cake. By successful, I mean a soft and fluffy western-type cake – not a hard pudding.

Squeeze around a pound of coconut for its cream or no. 1 milk. You will need 6 to 8 oz of cream. Alternatively, you can just open a can of coconut cream. But be sure to taste the coconut cream before using it for the recipe. Some brands are too sweet, whereas others have a “chemical” or soapy taste. Over low heat, reduce the cream to half its volume. I like adding several leaves of pandan and/ or Kaffir lime to flavor the coconut cream. It ends up having a greenish hue. Cool mixture.

(to make coconut cream more flavorful, reduce it over low flame with some pandan leaves)

If you can get bottled pandan juice (for cooking) from Southeast Asian markets, you will need it here. Otherwise, juice a bundle of pandan leaves in a blender with around ½ cup water. Strain.

Preheat oven 350°.

On a mixer with the whisk attached, beat 9 egg whites with one teaspoon cream of tartar until frothy. Slowly add in 100 grams castor sugar and beat until stiff peaks form. Set aside.

Combine the dry ingredients: 140 grams flour, two teaspoons baking powder and ½ teaspoon salt. You may also add one cup of desiccated or flaked coconut.

On a separate bowl, beat together 9 egg yolks with 155 grams castor sugar, 170 mL corn oil, one teaspoon vanilla, two tablespoons pandan juice, and one teaspoon green food color. Mix well, then sift in the dry ingredients. When mixed, gently fold 1/3 of the egg white mixture to lighten batter. Then pour this mixture over the remainder of the egg whites and fold.

Pour into an ungreased tube pan. Bake for 45 minutes or until cake springs back when touched. Invert pan and cool for one hour before loosening edges and unmolding.


(lining the muffin tins with cups will leave the cake with no edges to "cling on to" as the sponge cells develops - but the outcome was still favorable!)

I chose to make cupcakes out of this recipe and lined my tins with cupcake paper. Of course, this goes against the principles of making a true sponge cake, but my cupcakes ended up soft, fluffy and springy nonetheless!